By: Dave Vance
An overview of the major DNA sequencing technologies used in genetic genealogy, how they work, and why their differences matter.
The technologies underpinning consumer DNA testing for genetic genealogy have been pretty stable for at least the last decade, but 2025 marked the start of new changes with the adoption of next generation sequencing for autosomal testing. So it seems appropriate that we spend a blog post on an overview of the major variations in testing technologies that are either in common use or commonly discussed in genetic genealogy today,
Since most of our readers are not genetic testing experts, we’ve tried to summarize what are often very technical topics at a more accessible level but that probably still glosses over a level of detail that would be important to experts.
For those who truly don’t care about the technical details, we have also included an analogy for each variation that hopefully clarifies their different advantages and disadvantages.
The major variations of genetic testing technologies are often broken down into “generations” based on when they were invented:
- First Generation Sequencing
- Second Generation Sequencing
- Third Generation Sequencing
- Nanopore
- Single-Molecule-Real-Time Sequencing
For brevity and because the Third Generation techniques are not yet at a quality and price point suitable for consumer genetic genealogy testing, we’ll cover the major first and second generation testing types here and leave third generation for another time.
First Generation
The earliest DNA sequencing technologies are commonly grouped under the label “first generation sequencing,” a category that includes both Sanger sequencing and microarray genotyping. Although these methods differ significantly in how they operate, they share an important characteristic: they were designed to answer very specific questions about DNA, rather than to comprehensively read entire genomes.
First generation techniques laid the foundation for modern genetic genealogy. They provided highly accurate data at known locations in the genome and enabled the earliest large-scale DNA testing efforts, even though they were limited in scope, speed, and scalability compared to later technologies.
The History of Sanger Sequencing
In the 1970s scientists started experimenting with various techniques of sequencing DNA. By 1977, a British biochemist named Frederick Sanger finally settled on a repeatable process which became known as Sanger sequencing and for which he won his second Nobel Prize in Chemistry in 1980.
Sanger sequencing grew quickly to become the de facto standard DNA sequencing method and continued in that position over the next decades though the process was streamlined and automated.
In 2003 the Human Genome Project produced the first complete sequence mapping of the human genome (about 90% of it, actually) using a shotgun Sanger sequencing approach. The project took 13 years and cost $3 billion US dollars (consider that today the equivalent—a WGS test—is offered to consumers for a few hundred USD and completes in a matter of weeks).
How Sanger Sequencing Works
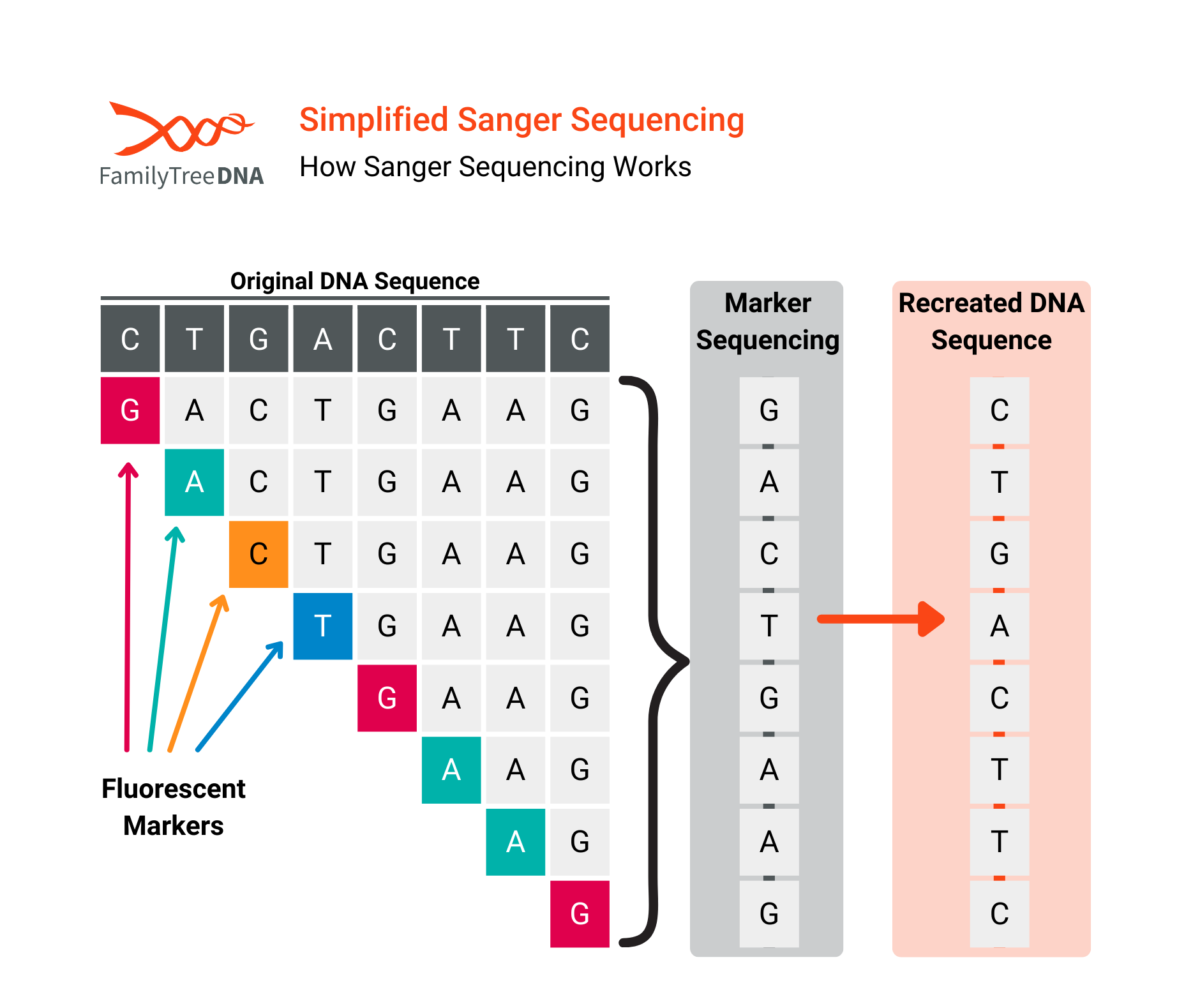
In the Sanger method:
- The DNA fragment(s) are extracted containing the target positions to be read.
- A DNA fragment is then processed through a gel containing several types of added nucleotides (A, T, C, G) which attach themselves to the target DNA.
- The number of nucleotides which attach to any given base depends on their position on the DNA fragment
- A special fluorescent nucleotide will attach at the end of each chain depending on the base’s own nucleotide value.
- The attached nucleotides are then measured using a laser.
- The sequence on the DNA fragment is reconstructed from those measurements.
Analogy Of Your DNA To A Book: Sanger Sequencing
Using the analogy of reading your DNA to reading a book, Sanger sequencing is like asking someone to go to page 136 and read the fourth sentence of the third paragraph.
If you knew that sentence was an important point (like if in your DNA you knew it was an important part of a specific gene) then that would be a quick way of reminding yourself what that sentence says.
But it would be very time-consuming to continually ask someone “now read the fourth sentence,” “now read the fifth sentence,” and so on to eventually remind yourself of the whole contents of the book. Yet that’s exactly how the very first human genome was sequenced.
Advantages and Disadvantages of Sanger Sequencing
Sanger sequencing is effective at sequencing relatively small fragments of DNA of no more than about 900 base pairs in length. If a larger coverage area is to be sequenced, the DNA has to be broken into smaller fragments which are separately sequenced and those sequences are then reassembled into the larger result. This process is called shotgun sequencing, the process used in the Human Genome Project.
For genetic genealogy, the primary advantage of Sanger sequencing is its very low error rate, with accuracies around 99.99%. It can also produce relatively “long reads” of 500 or more DNA letters, which are excellent for reading through repetitive regions of the genome that can confuse newer methods.
Although Sanger sequencing is not used as often today for genetic genealogy, it is still a popular and entirely relevant DNA sequencing technique. It continues to be a highly-reliable and high-quality method of sequencing a known position or small region of DNA. Its main disadvantages are that it is not as fast as the newer methods of DNA sequencing and is commercially cost-prohibitive to expand to larger regions of DNA.
Uses for Sanger Sequencing
Sanger sequencing is still regularly used for single STR/SNP and STR/SNP panel testing although not often for more exploratory types of DNA tests or those requiring larger coverage.
The History of Microarray Genotyping
Microarray genotyping was first invented in 1995 by Patrick O. Brown, Joseph DeRisi, and David Botstein, along with colleagues at Stanford University, and that year saw the publication of the first paper on the use of DNA microarrays for monitoring gene expression.
How Microarray Genotyping Works
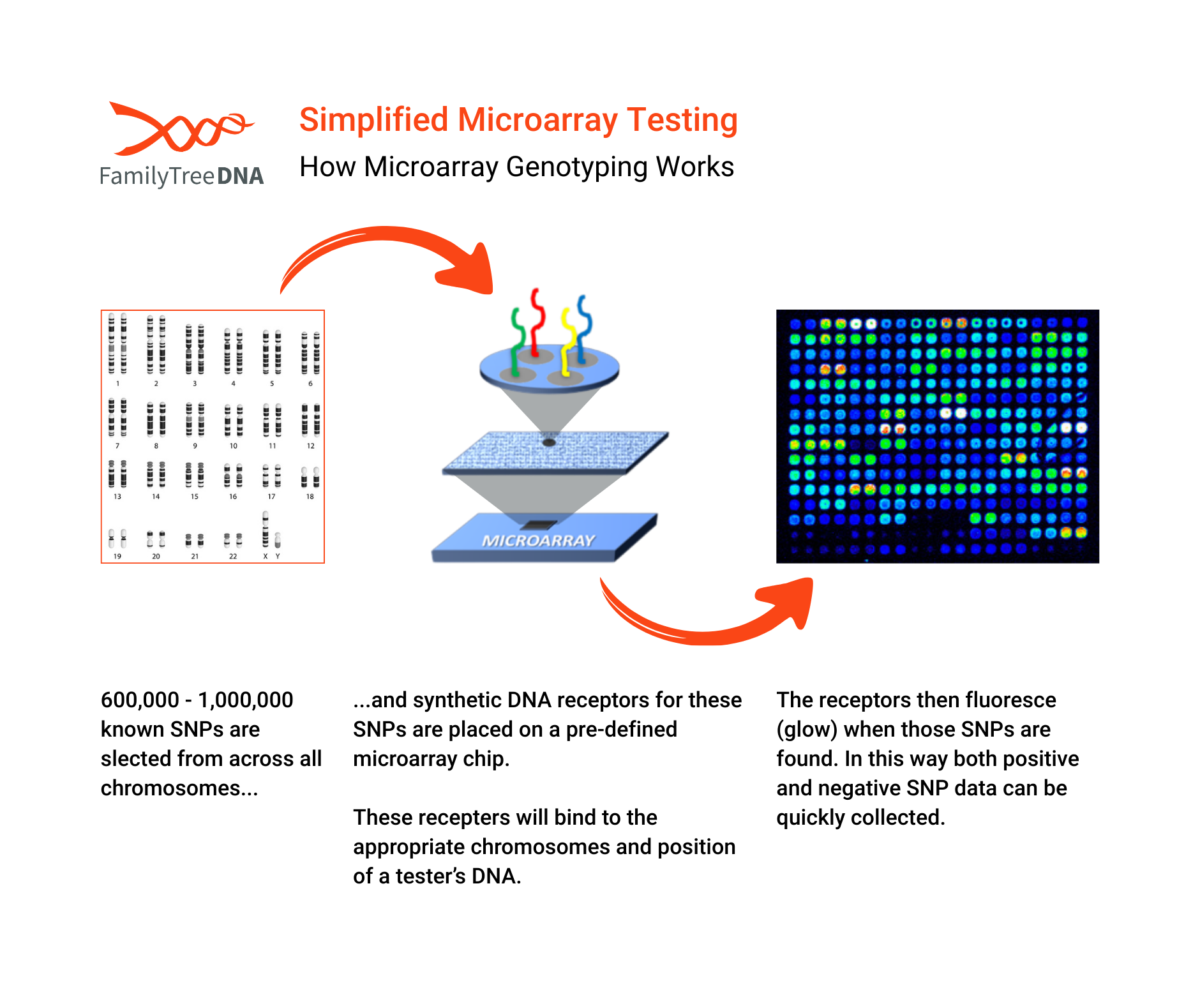
Microarray chips are “pre-built” targeting hundreds of thousands of known SNPs across all chromosomes. Instead of reading all the DNA letters in a sequence, a microarray performs a massive “spot-check” at those hundreds of thousands of pre-selected locations.
- A person’s DNA sample is washed over the chip.
- The DNA fragments “hybridize,” or stick, to the matching probes on the chip.
- A laser scanner then measures the fluorescence at each spot to determine which genetic variant a person has at each of those known SNP locations.
Microarrays report SNPs from either side of a person’s chromosomes together, with no assignment of individual allele values to your mother or father’s half of your DNA.
Phasing (the process of determining which specific alleles reside on the same parental chromosome) is performed as a later step by statistical imputation, with a corresponding loss of reliability for rarer or novel alleles.
Analogy Of Your DNA To A Book: Microarray Genotyping
Using the analogy of reading your DNA to reading a book, microarray testing is like pulling a key sentence from each chapter to create a summary of the book.
Using that summary, someone could pretty quickly categorize your book into one or more known genres like fiction, non-fiction, historical or modern, biography, textbook, etc (an analogy to ethnicity percentages).
They could also pretty quickly decide just from the summary if the contents of your book were similar or had overlaps with the content of someone else’s book (an analogy to matching shared centimorgans).
Advantages and Disadvantages of Microarray Genotyping
The key advantage of microarray technology is that it is cheap, fast, and scalable. Most of the cost is in building the chips in the first place. After mass-production, the testing phase is cheaper and quicker to run.
The technology’s greatest strength is also its greatest weakness. The most important limitation of a microarray is that it can only detect known SNP locations, so by definition it cannot detect unknown SNP mutations. This means the chip is completely blind to any other new, rare, or family-specific variants that are not already printed on the chip.
These limitations wouldn’t matter, for example, for finding a 3rd cousin (which relies on sharing large, common blocks of DNA), but it makes the technology unsuitable for advanced Y-DNA or mtDNA research, which depends on discovering new defining mutations.
This technological “blind spot” is the entire reason that more advanced sequencing tests are necessary.
For autosomal testing, because phasing (assignment of alleles to the same parental half of a chromosome) is statistical, microarrays struggle to reliably assign novel SNP mutations to the correct parental half. However, autosomal novel SNPs are not used for genetic genealogy so this limitation is more relevant to familial health tracing and other uses of genetic testing.
Uses for Microarray Genotyping
Microarrays are primarily used for autosomal testing, which makes them the testing method used most frequently in all of genetic genealogy.
Different chip versions vary slightly in number of SNPs reported but on average report 600,000-800,000 SNPs (so a typical estimate is 700,000). Most of those SNPs are preallocated for a given chip version but individual testing companies often also include a custom list of SNPs.
While most people think of microarrays as an autosomal testing technology, most chips also include at least some SNPs from the Y-chromosome, and may include mitochondrial variants as well. Depending on the chips in use by different companies this can amount to several thousand SNPs and often is enough for them to identify at least, for instance, a high-level Y-DNA haplogroup along with a tester’s autosomal results.
Second Generation
Second generation sequencing, more commonly referred to as next-generation sequencing (NGS), represented a fundamental shift in how DNA could be read and analyzed. Instead of examining one DNA fragment at a time, NGS made it possible to sequence millions or even billions of fragments simultaneously and then reconstruct those fragments computationally.
This massively parallel approach transformed genetics as a field. It dramatically reduced the cost and time required to sequence DNA and made large-scale genomic analysis feasible for research, clinical applications, and eventually consumer genetic genealogy products.
The History of Next-Generation Sequencing (NGS)
The next generation of DNA sequencing techniques was invented by a number of different scientists but the first commercial NGS test was released in 2005. It embraced and expanded on the “shotgun sequencing” technique in Sanger sequencing.
The hypothesis was, “if we can only read DNA in really short fragments, then let’s break the DNA into millions of really short pieces and read them all at once, then put the results back together through data analysis.”
NGS revolutionized the biological sciences. It is the technology that made it possible to sequence an entire human genome in a fraction of the time and cost of the original Human Genome Project.
NGS is the foundational engine for all modern genomics, including:
- cancer research
- clinical diagnostics
- study of the microbiome
How NGS Testing Works
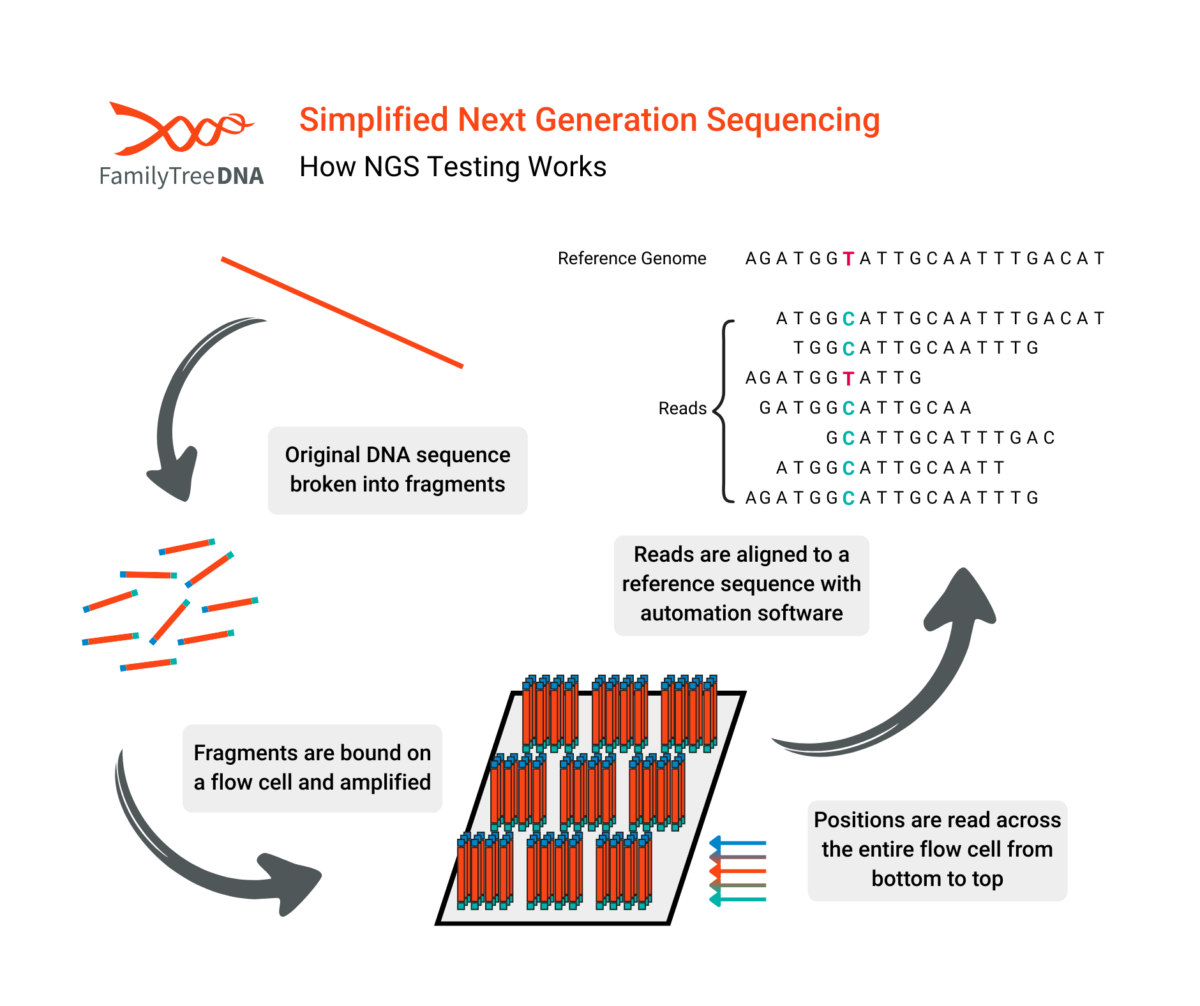
The defining feature of NGS is its “massively parallel” approach. While Sanger sequencing reads one DNA fragment at a time, NGS reads millions or billions of fragments simultaneously. The process is often compared to a “shredder.”
-
- The entire genome is shredded into millions of short fragments of DNA, typically 100-150 nucleotides long.
- The fragments are attached to a flow cell, and the sequencer reads all of them at once.
- During step 2, the machine adds fluorescent DNA nucleotides one by one.
- A camera takes a picture with each addition to record the sequence of every fragment.
- The fragments are mapped to “reads” which report small sections of alleles.
- A powerful computer pieces together these reads and maps them to a human reference genome.
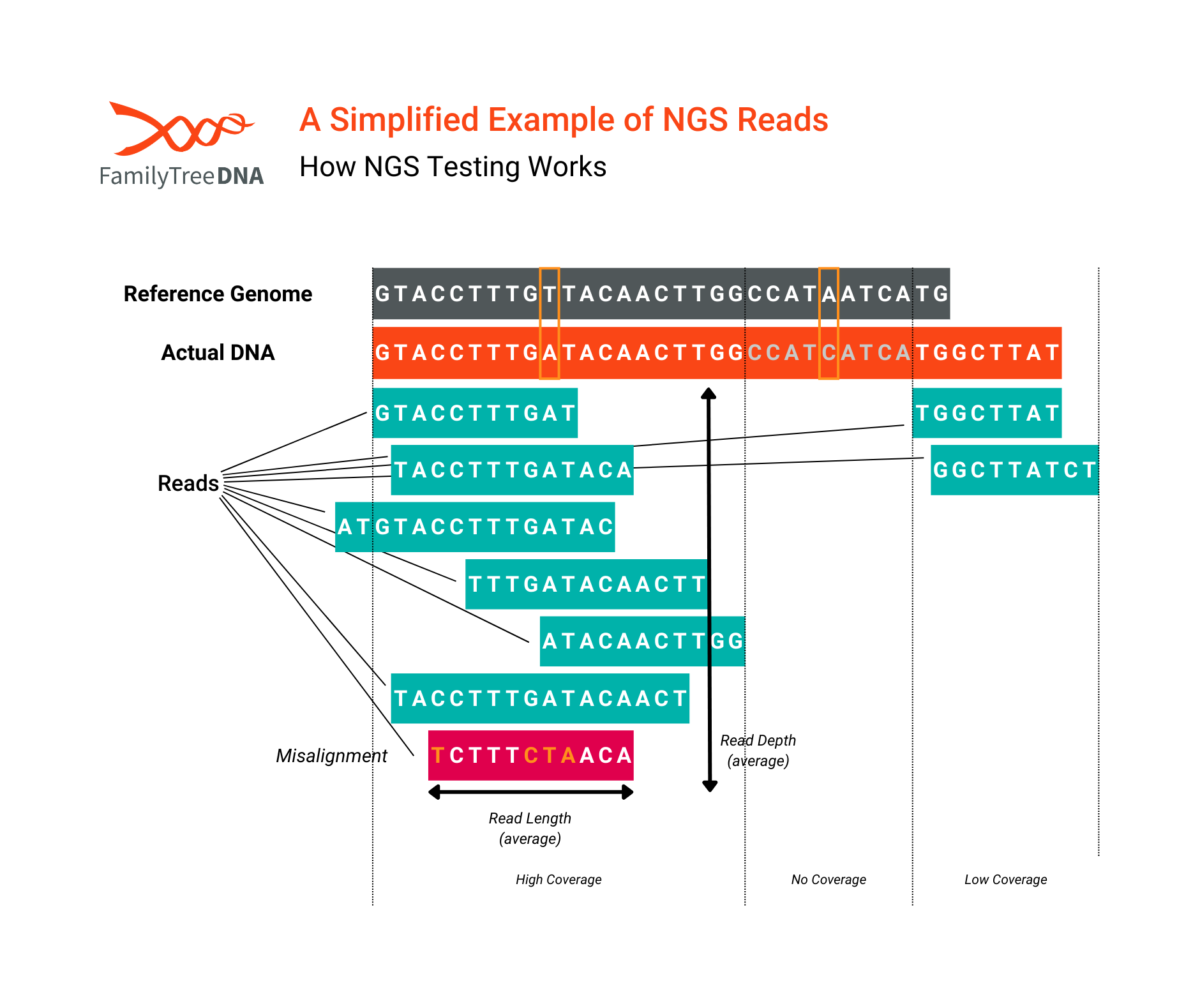
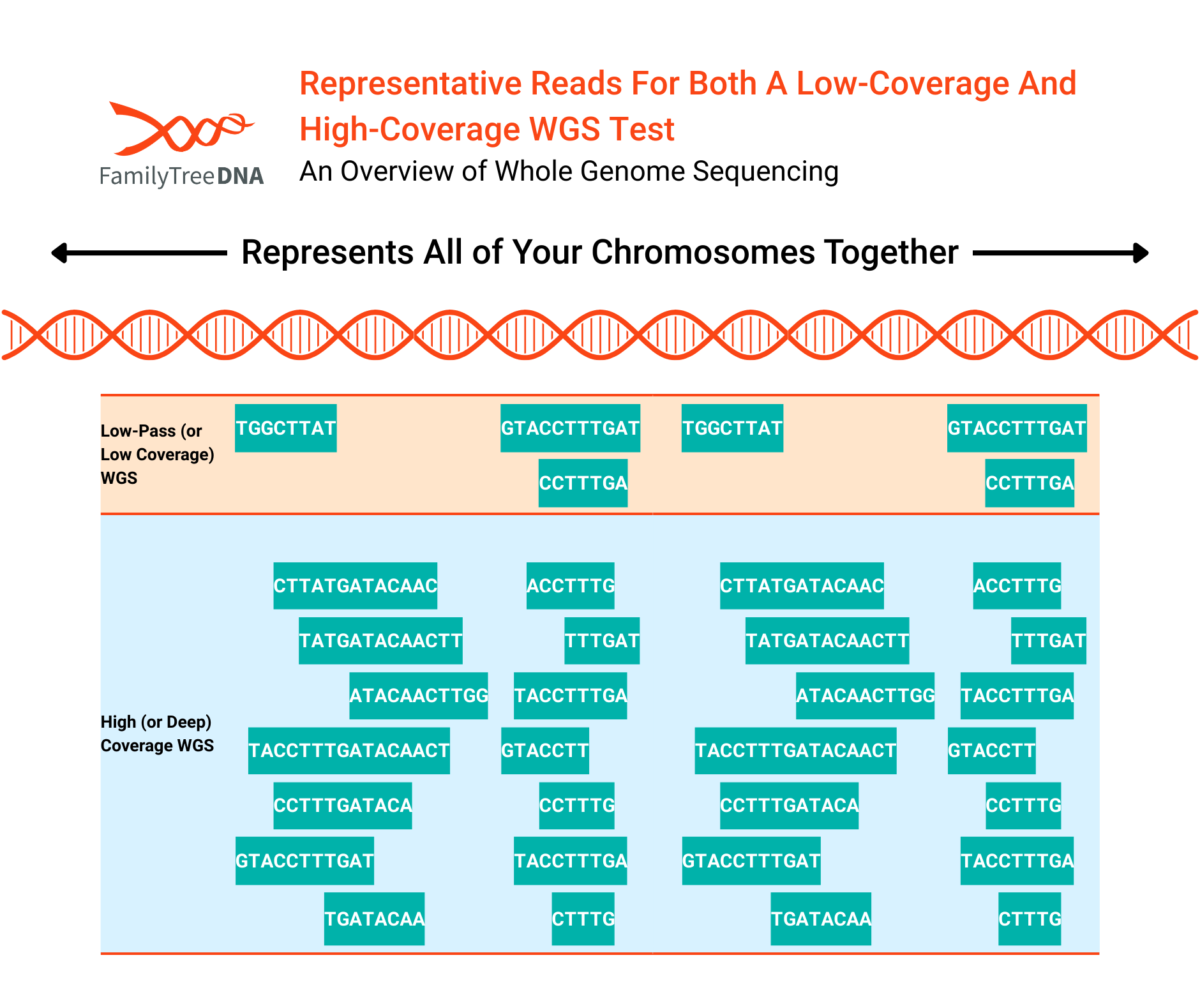
While reads can be targeted to specific regions of DNA and average number of reads can vary according to the test’s purpose, the number of reads for any particular position of a tester’s actual DNA will vary by test and (as shown in the above picture) any single test will have areas of high coverage, low coverage, or even no coverage at all.
For genetic genealogists, NGS is really the engine, not the car. Consumers do not buy an “NGS test”; they buy a product, like the mtFull Sequence test, the Big Y-700 or a particular Whole Genome Sequencing (WGS) test that uses NGS as an underlying technique to achieve the specific goals of the product.
Analogy Of Your DNA To A Book: NGS
Using the analogy of reading your DNA to reading a book, NGS testing is like if someone were to break the book into all its individual sentences, then feed every sentence individually into a computer and let the computer reassemble them all into the right order to recreate the entire book.
The computer is actually pretty good at figuring out the right order of the sentences, but occasionally it does miss a sentence or two or it may also end up with some sentences that it can’t accurately place into the book.
Advantages and Disadvantages of NGS
The main advantage of NGS is its greater discovery power. Because NGS reads every letter (unlike a microarray), it solves the microarray problem: it can find novel or rare variants. This is the essential capability that allows genetic genealogists to discover new, family-defining mutations.
The primary disadvantage of NGS is that the short reads resulting from the small, “shredded” fragments make the computer assembly challenging, especially in repetitive parts of the genome (like the Y-chromosome), which can be like reassembling a 1000-piece puzzle of a clear blue sky.
The short reads also inhibit the ability of NGS to map larger structural variants like STRs, although this limitation can be overcome with massive amounts of targeting.
And finally for autosomal DNA just as for microarrays, the short reads also require that more statistical imputation is used to phase the assignment of alleles to the same parental half of a chromosome, which limits the reliability of especially novel SNP assignment to the correct parental half when NGS is used for autosomal testing.
Because NGS has so many uses, many variations of it have evolved over the past two decades. There are however two major variations which underpin most NGS-based genetic genealogy products:
-
-
- Targeted Panel Sequencing
- Whole Genome Sequencing (WGS)
-
An Overview of Targeted Panel Sequencing
Targeted panel sequencing is a variation used for genetic genealogy tests that require only select data from specific regions of interest in a tester’s genome.
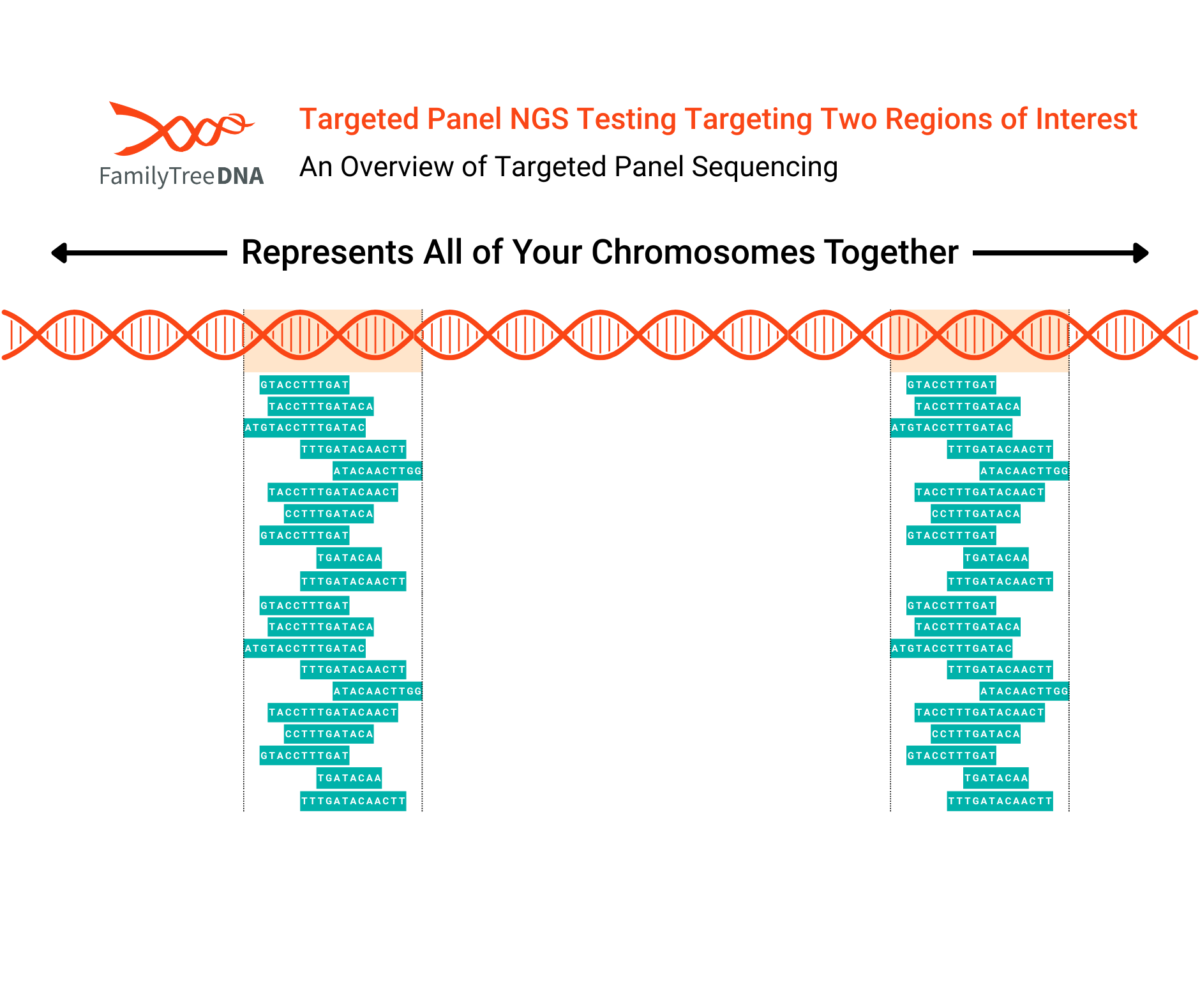
In the above picture, the DNA strand represents all of a tester’s chromosomes:
-
-
- Autosomes
- Y Chromosome
- X Chromosome
- Mitochondrial DNA
-
This example targeted panel test has been pre-configured to target two regions of DNA marked in orange.
By targeting specific regions, the test can ensure numbers of reads across those regions that would be cost-prohibitive across larger areas of coverage and are generally much higher than standard WGS tests. Targeted regions can be as small as a single gene or large enough (like Big Y-700) to return data on millions of base pairs.
Analogy Of Your DNA To A Book: Targeted Panel Sequencing
Using the analogy of reading your DNA to reading a book, targeted panel testing is like reading a few special sections of the book slowly and in detail to get a deep understanding of just those sections.
Advantages and Disadvantages of Targeted Panel Sequencing
Besides the earlier advantages and disadvantages of NGS generally, the deep coverage provided by targeted panels provides high sensitivity for rare variant calling, especially the rare, recent SNPs that place a person on a specific branch of the human Y-DNA or mtDNA family tree.
The disadvantage, of course, is that it’s a specialist tool for the specific regions of interest and does not provide any information about other regions.
Uses for Targeted Panel Sequencing
Targeted panel NGS is used for the two tests included in FamilyTreeDNA’s Big Y-700 and for its mtFull Sequence mtDNA product.
An Overview of Whole Genome Sequencing (WGS)
As the name suggests, a WGS test targets the entire genome. But just as in our analogy to reading a book, you might get many different levels of understanding of a book depending on how much time and attention you put into reading it. It’s important to understand how much of your genome a WGS test actually reports because it is dependent on the read depth of that WGS test.
The read depth of a WGS test is determined in advance and means the average number of times any specific position in the genome is expected to be read, and it is typically expressed as a multiple (e.g., 30x). It correlates directly with the confidence in the accuracy of the called alleles, as a higher read depth means a position will likely be sequenced more times, which increases reliability in identifying true variants over sequencing errors.
WGS tests at lower read depths also “skip more” of the genome (have larger areas of zero reads) than higher read depths
While the terms are not fixed to particular read depths, generally 0.4x, 1x, 2x, etc WGS tests are considered “low-pass” (or “low-coverage”). 30x WGS and higher can be considered “high coverage” (or “deep coverage”).
Sequencing costs, amount of data returned and data analysis, and storage costs of WGS tests are all directly related to read depth (and by extension, test coverage).
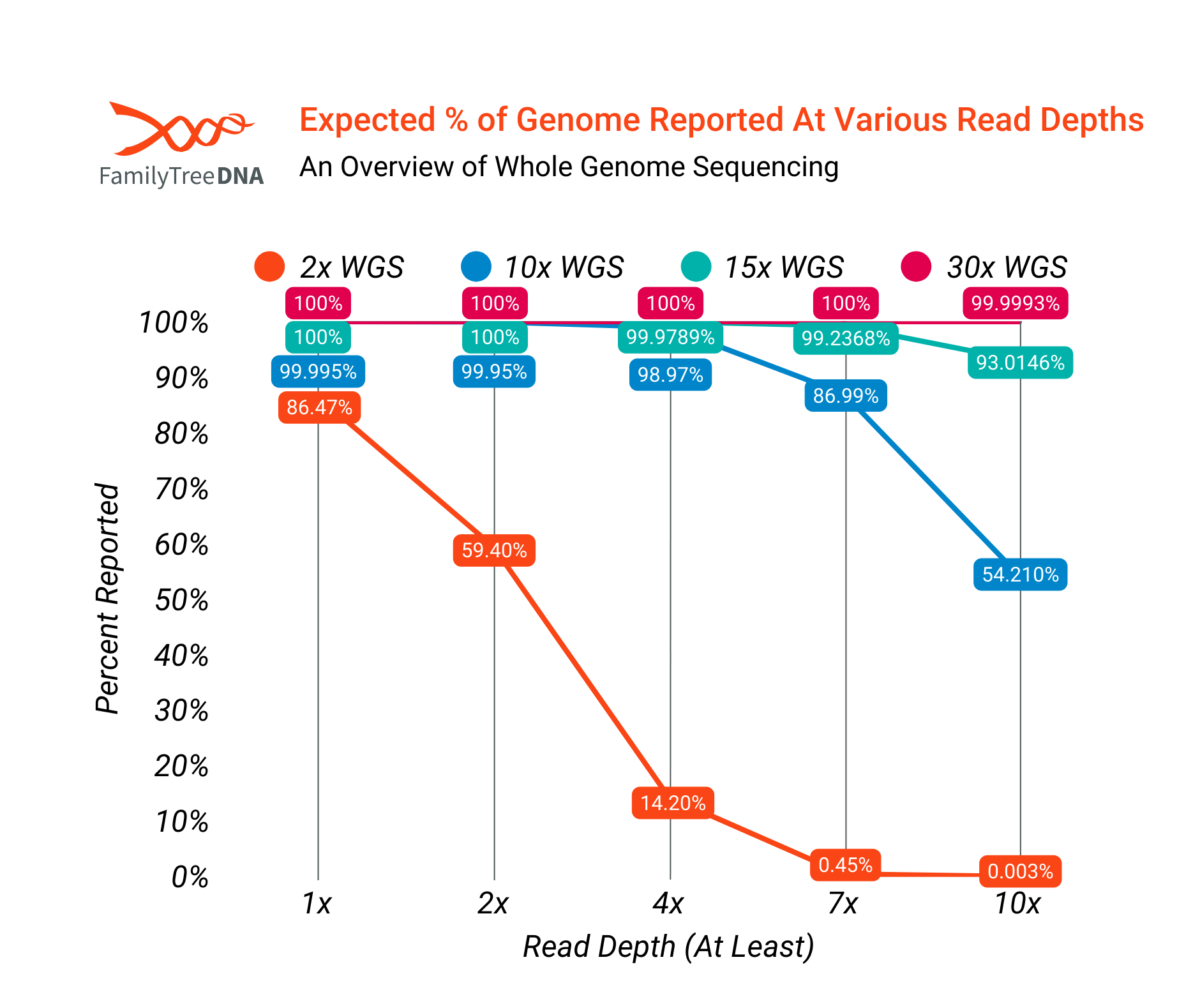
While actual WGS tests will vary slightly from mathematical models, the percentage of a genome which is reported at various read depths can be modeled, as shown below. A 2x WGS test, for example, should report about 86% of the genome at 1x or better, about 14% of the human genome at 4x or better, and correspondingly less at higher read depths.
Note that statistical imputation can improve the effective percentage of coverage by filling in areas of zero or unreliable coverage.
However, what read depth you need depends on the purpose of the test. Just as in our analogy of reading a book, if what you need is a summary of the book then skimming it at a high level may be all you need – i.e. using reads at 1x or 2x. And reading a pulp fiction book to pass the time on a long flight doesn’t demand the same attention as re-reading a textbook before a major exam. In the same way, there is no “best” read depth; it depends on the intended use for the data.
The following graph models the expected percentage of the genome reported at various read depths by WGS tests of different coverage levels. As shown in the graph, percent coverage of the genome rises rapidly with higher read depths until finally at the level of a 30x WGS the entire genome is effectively covered at even 10x, though there will always be at least some repetitive or otherwise hard to read regions that aren’t reported.
Analogy Of Your DNA To A Book: WGS
Using the analogy of reading your DNA to reading a book, a low-pass / low-coverage WGS would be like skimming the entire book to get a general sense of its contents.
Higher levels of coverage mean skimming less and reading more, until finally something like a 30x WGS would be analogous to reading the entire book thoroughly from cover to cover for deeper understanding.
Note that referring back to the same analogy used for describing microarrays, even a “low-pass” skim of a book might well be enough to recreate the same summary of the book that was described under microarrays!
Advantages and Disadvantages of Low-Pass WGS
A low-pass/low-coverage WGS offers the advantage of low cost and lower amounts of data; it also can be used to report or impute the same 700,000 SNPs as a microarray test and so produce comparable data output to standard autosomal tests.
On the other hand, low-pass WGS does not report enough of the genome at higher read depths to be comparable to a high coverage WGS test or to the regions reported by a targeted panel NGS test.
Advantages and Disadvantages of High-Coverage WGS
High-coverage WGS tests still have high costs and high amounts of data needing to be stored and analyzed, but represent the highest resolution of an entire genome available today.
It is important to note however that even high-coverage WGS tests are still not a complete fidelity allele by allele representation of a tester’s entire genome, as they still suffer from the same limitations as regular NGS testing in not being able to reliably phase novel SNPs to the correct parental side of chromosomes or reliably report large structure variants like larger STRs.
Uses for WGS
Low-coverage WGS has recently been adopted by MyHeritage as the go-forward basis for their autosomal tests. High-coverage WGS tests are available from many companies who provide the results for analysis by expert users.
In Summary
Each generation of DNA sequencing technology reflects a different balance between accuracy, coverage, cost, and analytical complexity. First generation methods such as Sanger sequencing and microarray genotyping remain valuable tools for targeted and cost-effective testing, while second generation sequencing provides the discovery power needed for deeper exploration of genetic variation.
There is no single “best” sequencing method for all purposes. The appropriate technology depends on what questions are being asked, which regions of DNA are relevant, and how the resulting data will be used. Understanding these differences allows genealogists to better interpret their results and to choose tests that align with their research goals rather than simply with the amount of data returned.

About the Author
Dave Vance
Senior Vice President and General Manager for FamilyTreeDNA
Dave Vance is a life-long genealogist with a professional career in IT services. He took a National Genographic Project DNA test in 2005 and has been a genetic genealogy enthusiast ever since to the mild consternation of his family and friends. He has been the editor of the Journal of Genetic Genealogy, is a surname Group Project Administrator and haplogroup Group Project Co-Administrator, has written tools, books, and articles on genetic genealogy, and finds occasions to speak publicly about various genetic genealogy topics even when he wasn’t invited to do so beforehand.